
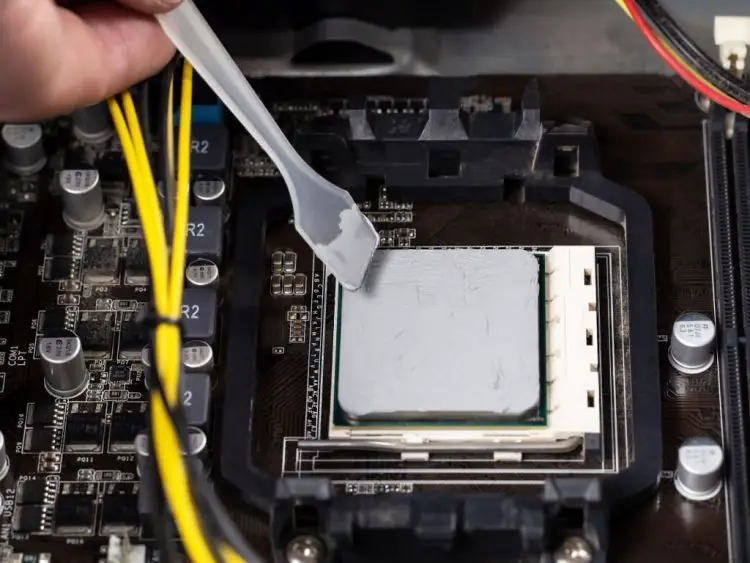
Thermal paste is important to make a perfect contact between your CPU cooler and the processor. It helps in filling the microscopic imperfections that could otherwise trap the air particles between the heatsink and your CPU, resulting in lower heat transfer. When it comes to applying the thermal paste, there’s a specific amount that you should consider. But if you didn’t know this before and you have applied too much thermal paste on your CPU, then it could do more harm than benefit. But there are some effective ways to overcome this issue.
Firstly, applying too much thermal paste on a CPU would cause it to spill over the sides when you’ll rest the heatsink at the top. Furthermore, the excessive thermal paste could spill and damage the CPU socket.
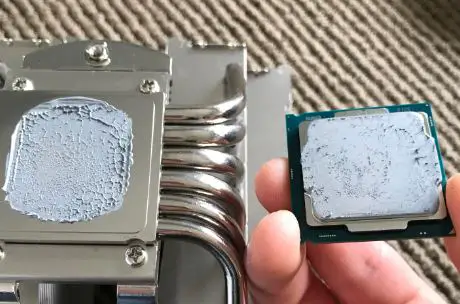
Keep in mind that using thermal paste excessively could also shorten the life span of your hardware. When too much thermal paste is put on a component, it could result in a lack of connectivity between components or may leak from the side and result in a short circuit.
Don’t worry, if you ended up throwing too much thermal paste on the CPU or GPU, then we’ve some possible solutions to get out of it.
How to Fix Too Much Thermal Paste
The only way around fixing excessive thermal paste is to remove it and re-apply the new thermal paste.
Here’s what you need to do:
Remove the Heatsink
The first step is to uninstall the heatsink from the CPU. You’ll need to unscrew the heatsink and then lift it off gently.
Cleaning the Paste
As we’ve applied too thermal paste, there’s the only way out of it, and that is to wipe off the existing thermal paste.
Now if you are using a good-quality thermal paste, then it wouldn’t be too dry to be removed. It would be more in a solid-liquidise form and can be removed without too much effort.
Scrapping off the Old Paste
First of all, you’ll need to remove the chunks of paste using a plastic scraper. Don’t use any metallic scrapper at this stage.
A plastic scrapper could easily remove the big chunks of the thermal paste within minutes. This is the safest method to remove the thermal paste from your components.
Cleaning the Residue
Once you are done removing the big chunks of the thermal paste from your hardware, it is time to clean any residue left behind.
Take a dry or micro-fibre cloth and dip it in rubbing alcohol or any thermal paste cleaning compound like ArcticClean.
Now use the wet end to moisten and remove the old thermal paste. After the leftover is wiped off, repeat the process once again to make sure there’s no layer of thermal paste behind.
Applying the New Thermal Paste
Now as you’ve cleaned the excessive thermal paste off from your component, it’s time to re-apply the thermal paste in the right way.
You’ll find a lot of methods on the internet on how to effectively apply the thermal paste on your CPU or GPU.
But here we’ll only discuss the thermal paste application method we use in our lab.
Just to let you know we’ve seen people applying toothpaste instead of thermal paste, which is totally wrong. Don’t do that. Toothpaste dries up quickly as compared the thermal paste. It’s not as good as the thermal paste and may damage your hardware in the longer run.
Well, if your CPU comes with a thermal paste applied to it, then there’s no need to reapply it again. But if your CPU doesn’t come with a thermal paste or you’ve applied too much thermal paste on it, and now removed it, then follow the below method to reapply it safely again.
Step 1: Drying
After you’ve completely removed the old thermal paste, it’s time to let your components dry for a moment. Don’t apply the new paste immediately and let the hardware air-dry at normal room temperature.
Remember that we need to dry the cooling solution that we used to remove the residue. Alcohol or any other thermal paste removing solutions are non-conductive, so you shouldn’t worry about the short circuits or other damages to your components.
Step 2: Applying
It’s time to apply the new paste to your hardware. Let’s say we want to apply the thermal paste on our CPU, then we’ll start with the famous “Dot Method”.

In this method, you have to apply a small portion of paste ( size equivalent to a pea or gain) at the centre of your processor. If you are building a PC for the first time, then it’s the easiest method to install thermal paste on your CPU.
Step 3: Spreading
Well, it’s better to leave the paste as it is and mount the heatsink on top of it to spread the thermal paste evenly. You’ll find people spreading the thermal paste all over the CPU to make it more effective, which doesn’t make any sense. After all, the only paste that would be in contact with the heatsink is the centre part of your CPU.
Therefore, applying thermal paste at the centre of your processor and mounting the CPU cooler on top it will evenly distribute the thermal paste. So, there’s no need to spread the thermal paste with fingers or by applying pressure on the CPU.
Conclusion
Finally, there’s no need to worry if you have applied too much thermal paste on your CPU or GPU. All you need is to remove it with the help of alcohol or any other thermal compound removing solution. Afterwards, let it air-dry and then re-apply the new thermal paste using the dot method.

Hi, this is Masab, the Founder of PC Building Lab. I’m a PC enthusiast who loves to share the prior knowledge and experience that I have with computers. Well, troubleshooting computers is in my DNA, what else I could say….