How to Fix Checking Media Presence Error
It’s common to see a “checking media presence” error as soon as you turn on your PC. Well, there are several reasons behind this error, the most common one is when your PC tries to boot up from a source that is unavailable at the time.
Usually, this type of error occurs when your computer tries to boot from your local network instead of your storage device. One of the most reported errors is checking the media presence MSI that occurs on MSI desktops or laptop PCs. Here in this guide, we will lay out some of the most working methods to get rid of this error.
But before we start our troubleshooting process, it’s good to learn about this error first, what are causes behind this error are, and how we can adopt the right strategies to prevent this error in the future.
What Does Checking Media Presence Error Means?
Let’s start from the basics at this stage. As you know there are different types of options to boot your computer. You can boot through a hard drive, USB, or local network, etc. Checking media presence error occurs when the computer cannot detect the bootable device or the boot file is missing from your drive.
At the error screen, you would come across the “Media Present” or “No Media Present” Usually, this booting error would cause the wrong boot order on the PC and may also corrupt the system files.
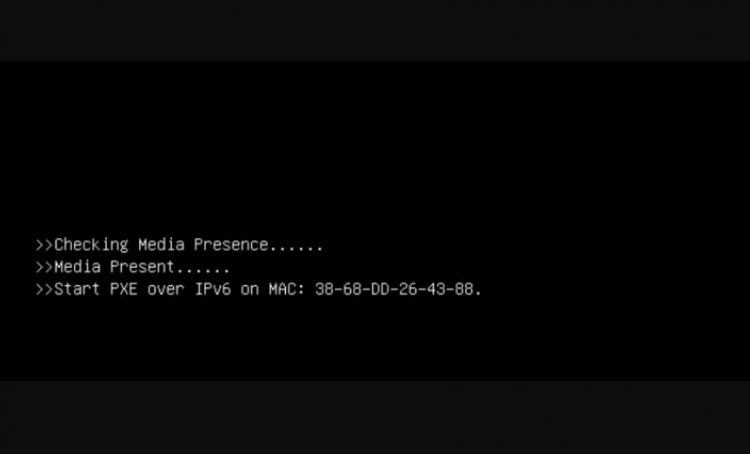
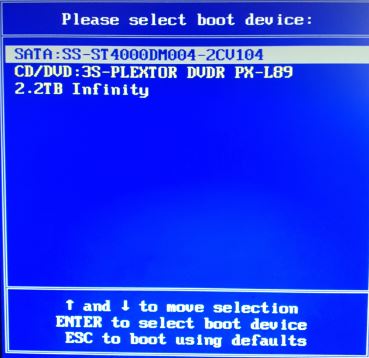
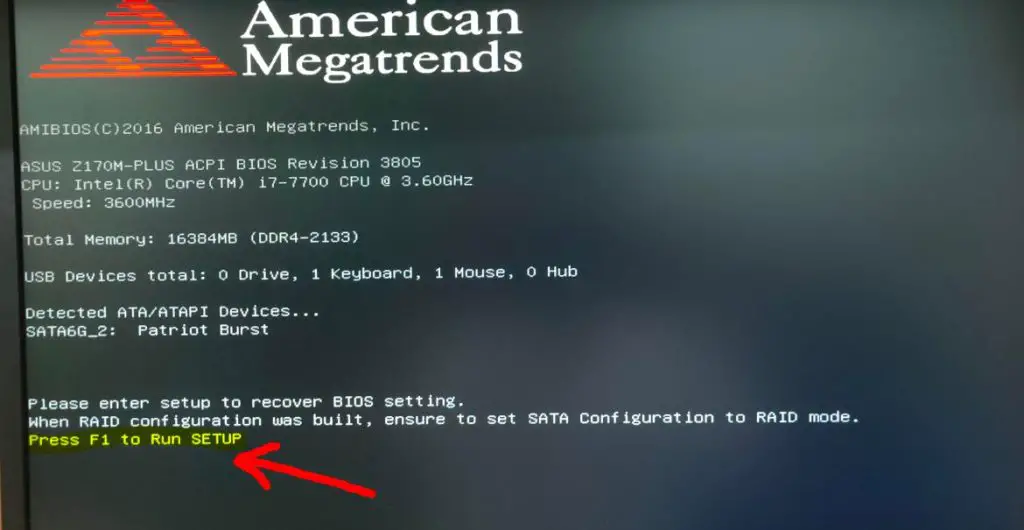
In most cases, you’ll see a series of commands on your screen as shown in the image below:
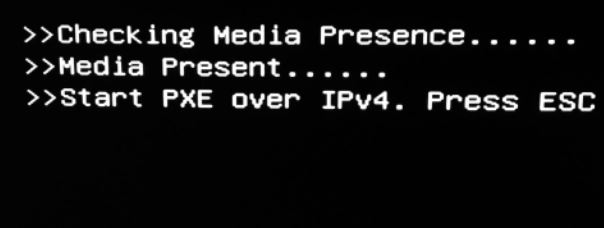
As you can see in the image above, there is a line with “PXE over IPv4” which shows that your computer is trying to boot from an internet connection. So instead of trying to boot up from a local hard drive, the system is trying to boot up from a local network.
In our case, we want our system to boot from our local hard drive, and not from the local network. So, we have to fix this issue by following some of the proven methods.
How to Fix Checking Media Presence Error Windows 10/8/7
1- Rearranging the Boot Menu
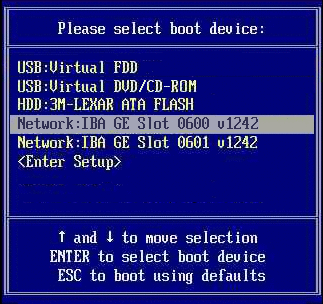
There are so many options available to boot from, and this error occurs when the computer is trying to boot from the wrong device. So, you have to set the boot priority for each device connected to your computer.
If the hard drive is on top of the boot order, the computer will try to boot first from the hard drive and then it will move on to another option if it doesn’t find any operating system. It’s simple to upgrade the BIOS with just a few steps:
- Press the BIOS setup button during the boot-up process.
- Go to the boot menu tab to see the bootable devices and their order.
- Keep the drive you want to boot at the top
- Save the settings and exit
- Please restart the computer to check whether it works or not
- Note that every motherboard brand has a different interface for the boot priority section.
2- Recovering Boot Files
If rearranging the boot menu won’t work for you, there this could be due to some missing or corrupt boot files. One way is to recover your lost file using the Windows Repair console. Another way around this is to reinstall your Windows 10 from scratch.
Go to the boot menu during the startup process by pressing Esc, F2, F10, or F12 keys, and there will be a list of bootable devices that appear in front of you. All you need to do is select the CD or USB as your first priority to install a fresh copy of Windows.
3- Checking the Health of Your Drive
If the steps mentioned above won’t work for you in troubleshooting the pc checking media presence error, the system may have some serious problems. Just check whether your hard drive or SSD is connected correctly to your CPU or not.
Disconnect and reconnect the hard drive. Dust residing inside the hard drive connectors could be causing the hard drive or SSD to disconnect over time. Just clean it with a soft brush.
If you are using an old hard drive, then it may be about to fail sooner or later. The hard drive comprises spindles, and each spindle is a collection of disks. When it faces a slight impact, it could result in the failure of a hard drive.
It’s better to copy your important data from your hard drive and move it to an SDD. To be honest, SSDs are cheaper now and are highly durable as compared to HDDs as they are no mechanical parts inside an SSD.
4- Disable Network Boot
If the problem is still there aren’t solved, you should disable the network boot in the BIOS setup. All you need to do is to follow these steps:
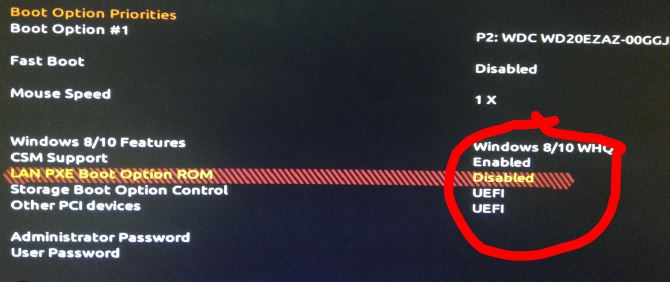
- Enter into your BIOS.
- Go to Security Settings, here you will see an option for Secure Boot. Disable this option.
- After disabling Secure Boot, change UEFI mode to Legacy
- Now, look for Network Boot in BIOS settings, and disable it.
- Apply the settings and restart your computer.
5- Disabling Wake on LAN (WoL)
In order to disable Wake on LAN in BIOS, here’s what you need to do:
- Restart your computer and press F2, Del, Esc, or F10 keys to enter into BIOS. Once you are inside the BIOS menu, look for power management, network settings, or advanced settings. This will depend upon your motherboard manufacturer, so you have to find the right one here.
- Once you are inside the power management or network menu, look for Wake-on-LAN or Remote Wakeup. You will find different options under them like Enabled, Disabled, or Auto.
- Now select the “Disabled” option and then Save & Exit BIOS settings, this will prevent your system from turning on when there’s a Wake on LAN signal.
Alternatively, you can also disable the Wake-on-Lan setting by navigating to your Device Manager and then selecting your Network Adapter. Right-click on the Network Adapter that you are using to connect to your Wi-Fi and then click on Properties.
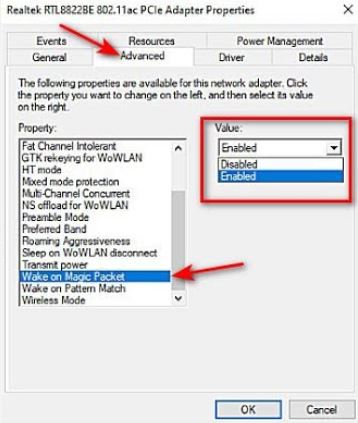
Once the Properties menu opens, you can navigate to Advanced and then scroll down to find Wake on Magic Packet option. Select this option and then click on “Disabled“. Click OK and then Save settings.
6- Resetting the CMOS
You can simply reset the CMOS to reload all the default BIOS settings to get rid of checking media presence on startup error. In order to reset CMOS, you will need to locate the CMOS battery present on your motherboard.
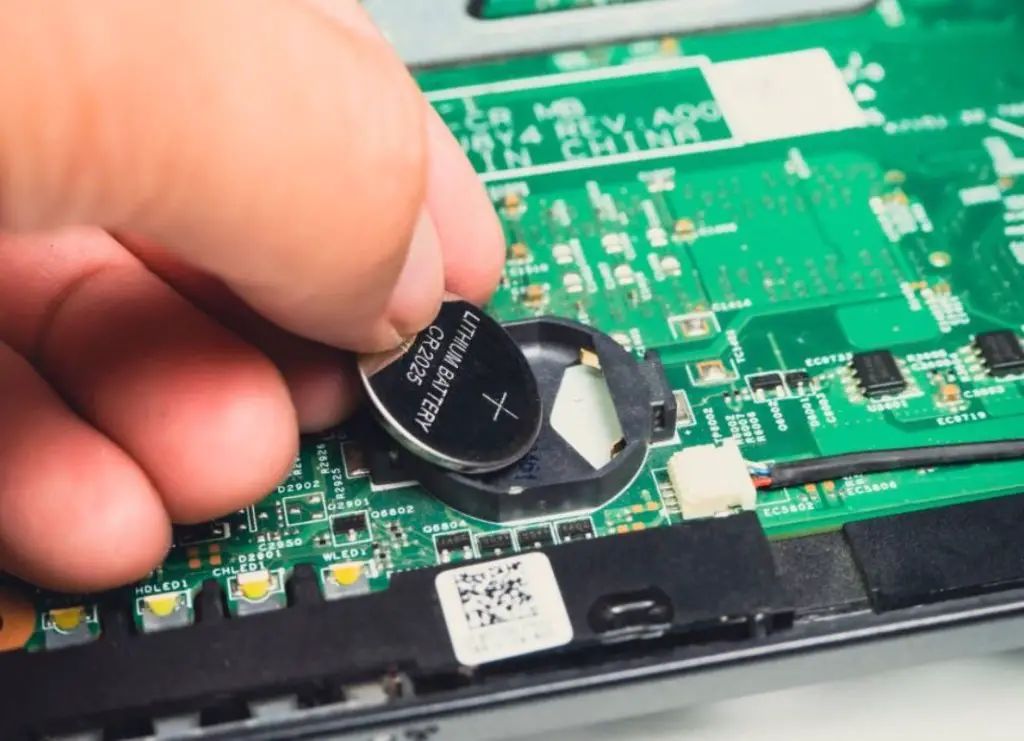
Once you find the CMOS battery on your mobo, gently remove it and leave it outside for 10 minutes or so. Afterward, reinsert the battery back into the slot and turn on your computer.
7- Update BIOS
If you are getting checking media fail in Windows 10 or no media present error, then you have to update the computer’s BIOS. Updating your BIOS is essential because this error causes severe damage to the system. To update the BIOS, you need to follow:
- Back up data as errors in updating can cause permanent damage to data
- Don’t turn off and restart the computer during updates
- Keep your computer in a stable environment to prevent power breakdown
- Update after connecting the laptop to the charger and don’t unplug during the update
8- Get Professional Assistance
If none of the above methods is working for you to fix the media presence error or if you don’t have enough knowledge for troubleshooting PC hardware, then I’ll recommend you to get technical assistance from your local computer shop.
You can also seek help by contacting customer support staff if your PC comes under warranty.
How to Get into BIOS in Windows 10?
If you want to configure the BIOS settings in Windows 10, then you need to follow:
- Go to Settings
- Click on Update and Security
- Click on the Recovery button in the side menu
- Click on Restart Now Button in the Advanced startup
- After restart, a blue screen appears having a different option; just click on troubleshoot
- Select Advanced options
What is a BIOS setup?
BIOS is an essential feature that is pre-installed on your motherboard and can be used to control different types of hardware connected to your PC. It’s like the backend where you manually control different peripherals installed on your motherboard.
What is the difference between BIOS and UEFI?
BIOS is a bit of low-level code that is stored in non-volatile memory. Computer systems use it to manage hardware and load a particular OS over another operating system.
UEFI stands for universal extensible firmware interface, which has become standard for computer systems that have installed the latest versions. It offers support for advanced features like GUI and even mouse support.
How to Access The BIOS?
BIOS is usually accessed with the help of the BIOS setup utility. It can be accessed in several ways, depending on the computer and the motherboard. You can follow the below steps to access the BIOS setup utility:
- Restart the computer where you can switch on the computer system, and you need to be aware of getting access to BIOS, which is free from all types of OS. It is because the BIOS setup is part of the motherboard of the computer system/
- The message would vary from one computer to another system. It contains the keys that the user requires to press entering BIOS. There would be an option come such as Entering Setup that would appear in starting few seconds to turn on the computer system.
- You can quickly enter the keys as given by the last message to access BIOS. You must enter the BIOS key for accessing it several times for entering into BIOS. Don’t hold down the key or press it many times. Restart the computer system and try to get access.
Final Thoughts
We hope you now have enough knowledge to fix checking media presence or without media presence. Troubleshooting media presence error Lenovo/MSI/HP machines is very simple, you can even get rid of this error by rearranging the boot menu in your BIOS by selecting your hard drive as “first boot priority”.
If you are installing Windows and come up with a checking media presence error, then you have to set your CD-ROM/DVD or USB as your first boot priority in BIOS. Also, keep in mind that if you end up with no media present, then this could be due to the fact that your system was unable to find any device to boot from.
FAQs
How you can fix media presence errors in HP/MSI/Lenovo ThinkCentre PC?
You’ll need to follow the same procedure to get rid of this error. Restart your PC, and once the HP, MSI, or Lenovo logo appears on the screen, press the BIOS button.
The key to enter into BIOS is different for HP, MSI, and Lenovo. However, the most often used keys are F1, F2, or F10.
Once you are inside the BIOS menu, navigate to the Boot option and select the “UEFI Boot”. Now set the Boot Priority to Hard Disk first, and then select “Save & Exit”
How do I fix checking media presence media present start PXE over IPv4?
PXE boot happens when your system tries to boot up from the IPv4-based network. You can easily fix this issue by navigating to your “BIOS” and then selecting the “Security” Tab. Once you are there, select the “Secure Boot” and disable it.
The next step is to head over to the “Legacy Boot” and then disable that as well. Save these settings and then exit the BIOS.
How to fix Windows 11 checking media presence?
Normally, the method that we have used to fix media presence errors on Windows 10 would be applied on Windows 11 as well. As this error occurs before the operating system, it usually has nothing to do with the version of your operating system.

Hi, this is Masab, the Founder of PC Building Lab. I’m a PC enthusiast who loves to share the prior knowledge and experience that I have with computers. Well, troubleshooting computers is in my DNA, what else I could say….